Colouring Henry
As promised I have tried to compose a distress ink colouring tutorial, now this is the first time I have ever attempted to do anything like this and I am no expert but I hope you can understand this and it helps with your colouring, this is just the way I do it and I am sure you will find lots of better composed tutorials on the blog. This tutorial was for colouring dear Whiff of Joy Christmas Henry, I chose to use Henry as an example as he only uses a couple of colours and I wanted to start simple, if you would like me to do another showing how I colour faces, hair and clothing I am quite willing now I have done one, just let me know as I have one half prepared.
These are my essentials, my beloved Fabriano HP Watercolour Paper Pad, available from Artifolk, it is quite expensive but well worth it, a fine brush (I like the size of this waterbrush but I do not fill up the tank with water as I like to have more control on the wet/dryness of the brush). A pad of kitchen roll, a plain white tile and of course distress ink pads or re-inkers, and last but not least Stazon Jet Black Ink a must !!!!!!!
I press the edges of the ink pads I will be using onto the tile, the little puddle in the middle is a couple of drops from a Tea Dye re-inker (my pad had run out).
Making sure your brush is just slightly damp pick up a little of the chosen ink and go around the edges of the feature to be coloured with a thin line of colour (here it is Tea Dye), wipe the brush on the kitchen roll and with soft circular movements spread the ink out wiping your brush often, when you have the effect you want just use the almost dry brush to make sure there is no harsh lines.
Here is the effect you are looking for.
Repeat the same process on the body and ears of Henry.

Again repeat for the tail. Then just build up the colour around the edges of the body head and ears just adding small amount of colour each time remembering to blend the edges
To get the right shade of pink for the ears and checks I blend a very small amount of Worn Lipstick ink with Tattered Rose, applying to the cheeks with little dots then joining them up with circular motions starting from the middle wiping the brush often work out towards the edges then back in again to soften edges. Apply a light wash of diluted Tea Dye ink to the tummy.
I have again gone around the edges with Tea Dye ink just to give good definition, ( I have would normally blend this a lot more so there was not such a definite change between the light and dark but I left it slightly unblended to help give you the idea) and following all the same rules add Worn Lipstick to the edge of the heart and then spread out.
And here is the finished Henry, hope this has helped you if you have any queries please ask me and if you would like anything included in the next tutorial that you may think I have skipped over please let me know, as I said this is my first tutorial and I am sure there are lots of gaps in here.
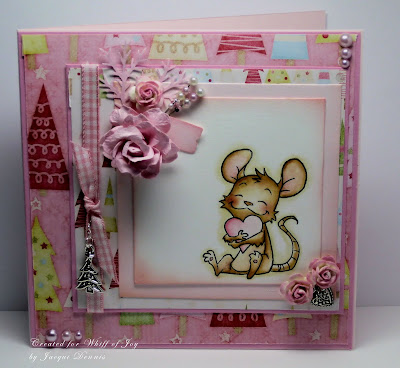
Finally my Finished card made with Henry, sorry about the dull colours, he is actually the colour of the image above but I couldn't get the lighting right as it was dark when I finished the card.


4 comments:
Wonderful tutorial. He is such a sweet Image. Thank you for taking the time to do this.
I think you did a fabulous job and I'm going to try this technique. Thanks for sharing!
This is darling,,,great job,Cookie
Awesome!!!!! And yes, I'd love to see your tutorial to color hair, skin, etc......
Post a Comment